Unity Test Runner with TeamCity
Run Unity tests from a TeamCity build configuration in a DevOps pipeline.

When I'm iterating on my game projects, I write tests to cover some of the more critical and important parts of my codebase. With Unity, I also like to use the test runner for validation of assets, ensuring that my scenes and prefabs are set up correctly.
Using a test suite allows me to refactor the code, make big changes, and upgrade to new Unity versions without manually having to test that everything still works as expected.
This provides me with some confidence that my game project remains healthy, and that I don't break anything by mistake as I progress with development.
Of course, the tests must run regularly, or they wouldn't be very useful. This is where automating them in a DevOps pipeline comes in. I use TeamCity, which is the CI tool of my choice, to run tests on each push to my Git repository.
The Goal
What we aim to achieve is that all the PlayMode and EditMode tests set up in Unity's test runner also run in TeamCity.
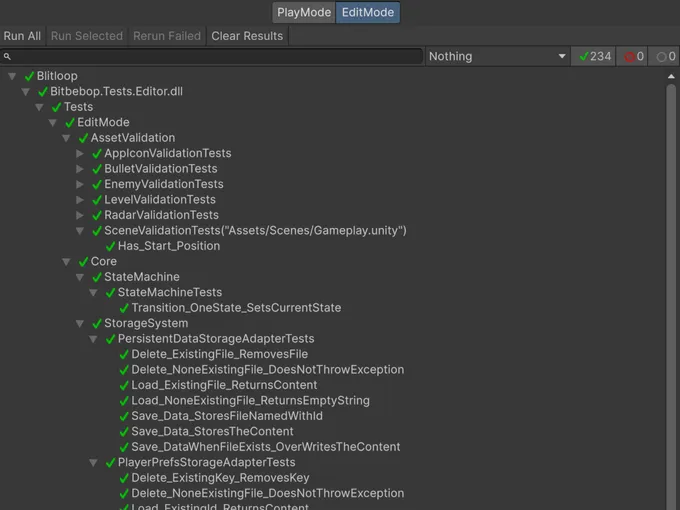
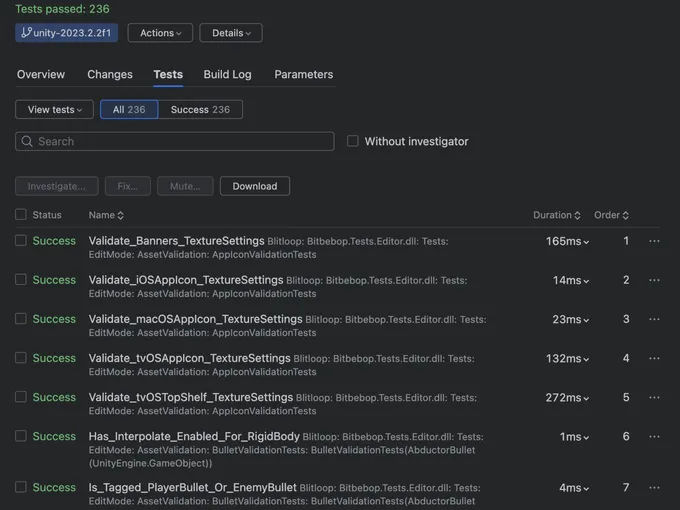
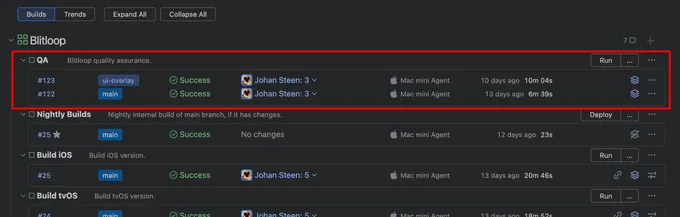
In the test suite above for one of my game projects, there are mostly EditMode tests and a few PlayMode tests. On each push to the Git repository, TeamCity checks out the project and executes the test suite. The results of the tests then show up under the Tests tab in TeamCity for the triggered job, as you can see below.
By having the test suite run automatically on each Git commit, there are endless possibilities for notifications of failing tests. These notifications can be sent via email, a Discord channel, reported as a status check in the Git repository, or created as an issue in an issue tracker.
TeamCity also adds a few more perks, such as individual test history. It keeps track of each test over time, which can provide valuable information in some cases.
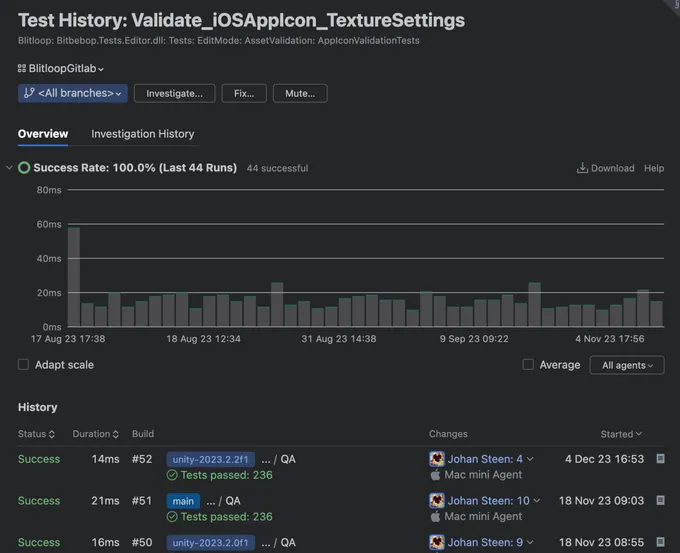
This can help identify recurring problematic areas. TeamCity labels these as flaky tests, to help with that.
Prefer video? The recording below contains everything in this article and more - subscribe to my YouTube channel for more content like this.
TeamCity Build Steps
The focus of this article is on how to set up TeamCity to run Unity's test suite. I'll assume you already have a working setup with a Git repository and TeamCity.
If using GitHub, setting it up is simple as TeamCity has GitHub support out-of-the-box. If you're like me and prefer to run your own Git server with something like Gitea, you can check out my previous article, Gitea Status Checks with TeamCity, on how to get that up and running.
In TeamCity, I've created a QA build configuration that I run on each commit.
This configuration doesn't build the full game to generate an executable. Instead, it just runs the tests from Unity to ensure the project's health remains. I have other build configurations that do the full build with Unity, but QA is supposed to be fast, so it can run on each commit.
I've set up my Git repository to not allow branches to be merged back to main unless the QA build configuration is successful.
Unity can run either EditMode or PlayMode tests, but not both types of tests at the same time. This is true with Unity Test Framework (UTF) v1.4, which is the version I'm currently using. I believe the experimental version of UTF v2.0 allows both types of tests to run together.
But for now, sticking with UTF v1.4, we need to run them separately. I'm using one build step for each test type.
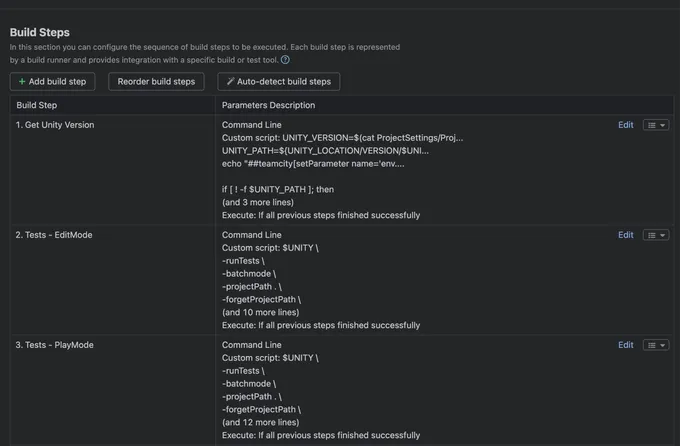
Parse Unity Version
For the observant, I'm using the initial step, Get Unity Version in my screenshot above, to not have to manually edit my TeamCity build configuration every time I upgrade to a new Unity version. I'm currently using the beta release channel of Unity, so I get a new version quite often. This first step parses the ProjectVersion.txt file that Unity generates in the ProjectSettings folder.
If curious, here's the grep command I use to determine the current version.
UNITY_VERSION=$(cat ProjectSettings/ProjectVersion.txt | grep -Eo '[0-9]+\.[0-9]+\.[0-9]+[a-z]{1}[0-9]+' | head -1)
The next steps, which run the tests, need to know the path to the Unity executable. I use this grep command in the first step to determine the current version so I can construct the appropriate path to Unity for the TeamCity agent to use.
Start Unity Test Runner
If you don't change Unity versions often, I'd recommend setting the path to Unity as a parameter in TeamCity instead, and using that in the test runner build steps.
All my build steps in TeamCity are Command Line build steps. The command to run the tests that I use in the build step looks like this.
PATH_TO_UNITY \
  -runTests \
  -batchmode \
  -projectPath . \
  -forgetProjectPath \
  -testPlatform EditMode \
  -testResults Reports/Tests/EditMode.xml \
  -logFile Logs/Tests-EditMode.log
PATH_TO_UNITY should be replaced with the actual path to the Unity executable. The other arguments of importance are testPlatform, which determines whether it's the PlayMode or EditMode tests that run, and testResults, which gives the test runner a path to save the results to. This file will later be parsed by TeamCity.
For the PlayMode test, we need to change these two arguments to get a different path for the test results and change the test platform.
-testPlatform PlayMode \
-testResults Reports/Tests/PlayMode.xml
The complete command for the PlayMode build step would then look like this:
PATH_TO_UNITY \
  -runTests \
  -batchmode \
  -projectPath . \
  -forgetProjectPath \
  -testPlatform PlayMode \
  -testResults Reports/Tests/PlayMode.xml \
  -logFile Logs/Tests-PlayMode.log
Build Features
With the build steps in place, we still need to tell TeamCity to use the reports generated by the test runner.
Fortunately, TeamCity has built-in support for parsing NUnit test reports, and NUnit is the library used by Unity's test runner. Taa-daa.
Thanks to this, all we need to do is go to Build Features in the build configuration and add the XML report processing build feature.
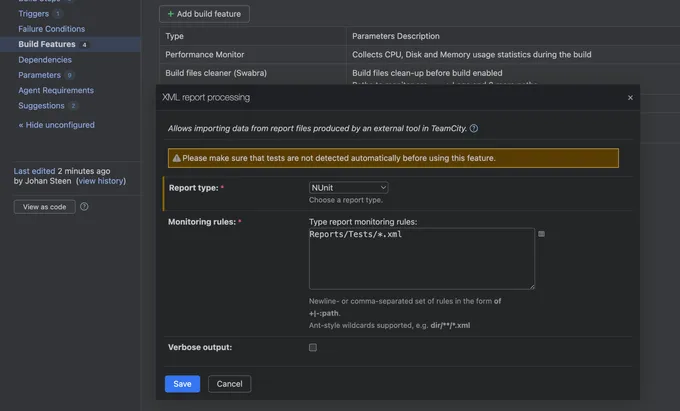
There are only two settings here. The Report type should be set to NUnit, and the Monitoring rules tell the processor where to find the test results. If you used the same paths as me for the testResults argument in the previous build steps, you would set the monitoring rule to Reports/Tests/*.xml.
Conclusion
That's pretty much it! By now you should have the Unity test runner set up in TeamCity and can start reaping the benefits of keeping your game projects healthy. TeamCity's built-in support for NUnit test reports makes setting this up a breeze.
At the time of writing this article, I was using Unity v6b13 and TeamCity 2024.03. The world of DevOps changes rapidly, so things might be different as time passes, compared to how it was set up using these specific versions.